Step-by-Step Guide to Optimizing Your Cold Email Deliverability
Contents
No matter how much time and effort you’ve put into your email, it won’t matter if you’re not also focusing on one other area:
Deliverability.
One in five emails never reach the inbox. Imagine if they all made it through. Email would be a useless channel. Unfortunately, the same strategies and protocols that try to intercept spam can also leave your email lingering in limbo, the spam folder, or the Promotions tab.
Deliverability issues can destroy your open and click-through rates, engagement, conversions, outreach, and everything else you’re hoping to accomplish with an email campaign in the first place.
Optimizing for deliverability is a must in the world of email outreach and marketing. Let’s dig in.
Email Deliverability: The Basics
Email deliverability is a set of steps or processes that happen in order to place your email in someone’s inbox. If you believe having a valid email address and hitting the send button means your message is successfully delivered, you’re wrong.
I’m going to oversimplify a little here: when you hit send on an email, the ISPs and email servers of your recipient quickly go through a lengthy checklist before allowing you access to an inbox (where you might still get flagged as spam or end up in one of the tabs). They look at:
- Your sender reputation, including abuse reports, volume (too much too soon is a red flag), blacklists, and spam traps.
- Your content. Is it spammy or too promotional (text-to-image ratio, long links, text-to-html ratio)? Does it contain spam trigger words or profanity?
Deliverability is a moving target, slower-moving than SEO algorithms, but moving nonetheless. Resources like Return Path can help keep you updated.
Abuse Reports
You can mark any email that arrives in your inbox as spam. This helps the email service providers (ESPs) like Gmail learn to better identify spam and keep your inbox cleaner. That’s good.
Every time someone reports one of your emails as spam, though, it gets added to an abuse report on you as a sender. Too many, and you’ll be flagged as a questionable sender, and your emails will get flagged or blocked from delivery. That’s bad.

The usual threshold over a month of sending is anywhere from 0.5% down to 0.15%, depending on the volume sent.
To avoid abuse reports, only send personalized and relevant messages to your recipients.
Verbiage
Choose your words carefully. Don’t make them too ‘salesy’, and avoid using the dollar sign, too many bolded words, all-caps, FREE!!, and emojis in cold and business emails.
When the servers find any of those, they take a much, much closer look at you and your message.
With the arrival of GDPR legislation last year, the major email providers like Microsoft, Google, and Yahoo have implemented more aggressive features for their spam filters. No one wants to be found in violation of the new rules. Again, that’s generally a good thing, but it does make your job just a little more difficult.
Links and images
One sure-fire way to get caught by spam filters is sending emails with tons of links, images, or gifs. Too many links are often a sign of spammy emails, so we recommend having no more than 2 in an email, including the signature. Images and gifs are treated the same as links, so if you must include them in your emails (which we generally recommend against), have no more than one.
Warming up a new domain? All bets are off. Start off with no links in your email at all to be safe, and focus on getting replies before you start sending cold emails.
Blacklisting
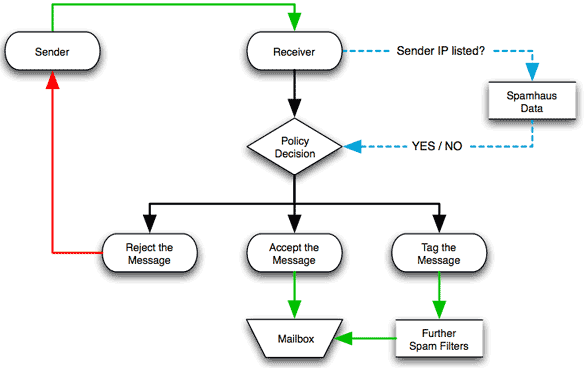
Blacklisting usually happens when either a particular IP address or sending domain is flagged for spam-like behavior.
End up on any of the critical email blacklists, and you’ll have to jump through hoops to get removed from them … if it’s even possible at all. The solution? Don’t do anything to get blacklisted.
Furthermore, you should know that new domains can be penalized for low engagement.
How does that work?
Let’s pretend you have an email list of roughly 10,000, and about 6,000 of those contacts are with G Suite or Gmail. You send a 4-email sequence that only generates an open rate of 5%. That means there are 22,800 emails sitting unopened on Gmail servers from your new domain.
You can see how that might raise a few digital eyebrows, right? In that scenario, your domain reputation could be downgraded from medium to low, which would affect any future emails, and could see you plummet from low to bad. At that point, it’s game over for that domain.
The solution? Work hard to send high-quality, valuable, and relevant emails using a clean list.
Step-by-Step Guide to Maximizing Your Deliverability
You should understand the basics by this point: Your email is checked against abuse reports, blacklists, and the individual ESP spam filters and checklists. You’ve got to successfully run that gauntlet to make it to the inbox.
Give yourself a head start with these steps to maximize the chances you’ll make it to the finish line.
Step 1: Your DNS Records
The domain name system (DNS) is part of the internet’s infrastructure. Honestly, you don’t need to understand it in detail, but there are a few parts that can affect your email deliverability.
If one element is incorrect or missing, you could be blocked by a server before even making it to the spam filter.
As relates to email, your record consists of:
- Sender Policy Framework (SPF). This verifies that you are who you say you are. That’s obviously going to carry a lot of weight with the ESPs and filters.
- DomainKeys Identified Mail (DKIM). This is a better way to authenticate. Think of it like the keys to unlock the message.
- Domain Message Authentication Reporting and Conformance (DMARC). This used to be optional, but with changes that Google and Microsoft have made to their algorithms, is now absolutely essential. Microsoft recently announced that they will relegate to spam folders any mail account that doesn’t have DMARC set up.
The SPF is indicated on the mailed-by: line. It needs to match for corporate servers. Some ESPs like Mailshake allow you to update. You should merge multiple SPF records into one “flattened” record.
The DKIM is your signed by: line. It should reflect the from: domain. To check in G Suite: admin.google.com > Apps > GSuite > Gmail > Authenticate Email > Generate Record > Authenticate.
Finally, DMARC is not currently required, but is increasingly necessary for bigger corporate servers. A tool like dmarcian can help you with it.
Step 2: Keep a Clean List
Have a targeted and scrubbed list of recipients. Only send relevant content. If too many people mark your messages as spam, or you’re getting too many bounces, you’re toast. At a minimum, verify your email addresses, remove hard bounces immediately, and soft bounces after multiple attempts.
Step 3: Use a Reputable Provider
Use a G Suite (i.e. non-Gmail.com or non-Hotmail.com) email account. G Suite is a trusted email service provider, it’s affordable, and offers plenty of tools and integrations.
Step 4: Use a Better DNS Manager
A robust DNS Manager like Cloudflare lets you manage your SPF, DKIM, and DMARC with ease.
Step 5: Start Slow
Using a new domain or address? You need to warm it up with the ESPs and filters. Start with no more than 50 per day and work up from there. Be consistent as much as possible with volume and sending schedule. Too much too soon and you’ll likely get flagged.
Follow a system that looks something like this:
- Week 1: 50
- Week 2: 85
- Week 3: 100
- Week 4: 150
- Week 5: 250
- Week 6: 380
and so on…
There isn’t a rule or exact number. It’s a matter of testing and evaluating. If you ever hit Google’s quota, or start seeing bounces higher than 5%, we recommend to step back to the previous limit and wait for another week.
Above all, once you find a sweet spot, be consistent as much as possible with volume and sending schedule. Too much too soon and you’ll likely get flagged.
Step 6: Include an Easy Opt-out
Besides being a requirement, an easy unsubscribe option is better than a recipient having no choice but to report you as spam. Since most people doing cold email would rather not include an unsubscribe link in their emails (though you can do this in Mailshake), your best bet is to make it clear how someone can opt out.
With Mailshake, anyone who responds with the words ‘unsubscribe’, ‘remove me’, or similar phrases will automatically be removed from your list, effectively unsubscribing them. One option here would be to include something like this under your signature:
PS. Don’t want to hear from me again? Reply with the word ‘unsubscribe’ and I’ll take you off my list!’
Step 7: Optimize for Open and Response Rates
Engagement is the name of the game. Do everything you can to get recipients to open your email, and respond to its message (whatever that may mean).
This also means evolving your copy over time. Beyond just a strategy to keep your engagement high, we’ve seen lots of accounts who ended up seeing worse and worse deliverability rates even with high-quality lists and good copy, because they used the exact same copy for months and months.
One easy way to make sure your copy is staying fresh and ahead of spam traps is by consistently AB testing it.
Step 8: Use a Name in the From Field
Are you more likely to open a cold email from frank@yourcompany.com, or info@yourcompany.com?
Never, ever use the dreaded donotreply@ for any reason whatsoever. Be real. Be authentic. Be a human being.
There’s a lot more you could and ultimately should be doing, too. Maximizing your deliverability is a long game, and includes reputation, authentication, content, and more.
But start with these nine, and go from there. Trying to do too much at once can quickly get confusing and feel overwhelming.

Your Toolkit
Check out these tools to help on your path to better deliverability:
- Mailshake has a real-time email analyzer.
- MX Toolbox can check the health of DNS records.
- Mail Tester can score and provide a deliverability checklist of things to fix.
- GlockApps will help you get out of the Promotions tab (you want and need to hit the inbox and only the inbox). It’s $30/month, but provides placement results – Inbox, Tabs, Spam, Missing – and why you’re landing there.
- Postmaster Tools is free from Google. It’s critical to tracking your “Domain Reputation” month over month. Check it at least twice monthly.
Ultimately, you can always work to increase email deliverability. Make it a priority.
And get to that inbox.

